

EZ SLEEVE
A Removable Plastic Sleeve to Form Quick, Accurate, Clean Holes in Concrete
The Trusted Choice for Clean, Tapered Concrete Holes
EZ Sleeve – the industry-leading solution for creating precise, tapered holes in concrete during the setting process. Available in two sizes, EZ Sleeve is a pioneering plastic product designed to simplify concrete hole formation, making it ideal for applications such as railing, fence, and post installations.
Originally invented in the 1980s, EZ Sleeve has proven to be a durable, reliable, and efficient tool, and remains the original choice for contractors and builders worldwide. Now operating independently under Auciello Iron Works, Inc., we proudly continue to deliver high-quality products from our roots in Massachusetts, where our company has been established since 1932.
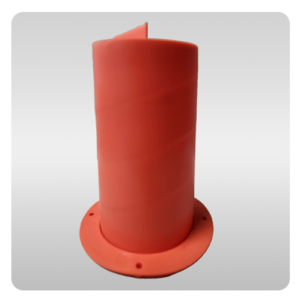
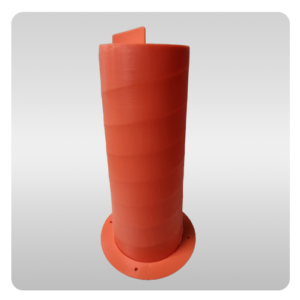
EZ Sleeve is a safety orange, tapered plastic tube with a pull-out tab on the closed top and a snap-on base. After the concrete has set, the sleeve is removed, leaving behind a perfectly tapered hole for easy post installation.
The EZ Sleeve represents decades of expertise and a dedication to delivering practical, reliable products that stand the test of time. Whether you’re working on a small residential project or a large-scale commercial build, EZ Sleeve ensures precision and ease in the concrete forming process, helping to save time and reduce material waste. We remain steadfast in our mission to support the industry with trusted, high-performance products.
What to Expect


PRODUCT SPECIFICATIONS
*Please visit ARCAT for Auciello Iron Works online architectural catalog.
PART I - GENERAL
1.1 – SECTION INCLUDES
- Plastic post hole forms.
1.2 – RELATED SECTIONS
** NOTE TO SPECIFIER ** Delete any sections below not relevant to this project; add others as required.
- Section 03 30 00 – Cast-in-Place Concrete.
- Section 05 52 13 – Pipe and Tube Railings.
- Section 05 73 16 – Wire Rope Decorative Metal Railings.
1.3 – SUBMITTALS
- Submit under provisions of Section 01 30 00 – Administrative Requirements.
- Product Data:
- Manufacturer’s data sheets on each product to be used.
- Preparation instructions and recommendations.
- Storage and handling requirements and recommendations.
- Typical installation methods.
- Verification Samples: Two representative units of each type, size, pattern and color.
- Shop Drawings: Include details of materials, construction and finish. Include relationship with adjacent construction.
1.4 – QUALITY ASSURANCE
- Manufacturer Qualifications: Company specializing in manufacturing products specified in this section with a minimum five years documented experience.
- Installer Qualifications: Company specializing in performing Work of this section with minimum two years documented experience with projects of similar scope and complexity.
- Source Limitations: Provide each type of product from a single manufacturing source to ensure uniformity.*
* NOTE TO SPECIFIER ** Include mock-up if the project size or quality warrant the expense. The following is one example of how a mock-up might be specified. When deciding on the extent of the mock-up, consider all the major different types of work on the project. - Mock-Up: Construct a mock-up with actual materials in sufficient time for Architect’s review and to not delay construction progress. Locate mock-up as acceptable to Architect and provide temporary foundations and support.
- Intent of mock-up is to demonstrate
- Quality of workmanship and visual appearance.
- If mock-up is not acceptable, rebuild mock-up until satisfactory results are achieved.
- Retain mock-up during construction as a standard for comparison with completed work.
- Do not alter or remove mock-up until work is completed or removal is authorized.
1.5 – PRE-INSTALLATION CONFERENCE
- Convene a conference approximately two weeks before scheduled commencement of the Work. Attendees shall include Architect, Contractor and trades involved. Agenda shall include schedule, responsibilities, critical path items and approvals.
1.6 – DELIVERY, STORAGE, AND HANDLING
- Store and handle in strict compliance with manufacturer’s written instructions and recommendations.
- Protect from damage due to weather, excessive temperature, and construction operations.
1.7 – PROJECT CONDITIONS
- Maintain environmental conditions (temperature, humidity, and ventilation) within limits recommended by manufacturer for optimum results. Do not install products under environmental conditions outside manufacturer’s recommended limits.
1.8 – WARRANTY
- Manufacturer’s standard limited warranty unless indicated otherwise.
PART II - PRODUCTS
2.1 – MANUFACTURERS
- Acceptable Manufacturer: Auciello Iron Works, Inc.,
Which is located at:
560 Main St.
Hudson, MA 01749
Tel: 978-568-8382
Fax: 978-562-9982
Email: request info mail@aucielloiron.com;
Web: https://aucielloironworks.com
** NOTE TO SPECIFIER ** Delete one of the following two paragraphs; coordinate with requirements of Division 1 section on product options and substitutions. - Substitutions: Not permitted.
- Requests for substitutions will be considered in accordance with provisions of Section 01 60 00 – Product Requirements.
2.2 – PLASTIC POST HOLE FORMS
** NOTE TO SPECIFIER ** Delete basis of design option not required.
- Basis of Design: EZ Sleeve, Model 3006; as manufactured by Auciello Iron Works, Inc.
- Material: 1/16 inch (1.6 mm) thick polyethylene.
- Description: Round form with closed top and snap-on base.
- Maximum Pipe Size: 2-3/8 inch (60 mm) outside diameter or 2 inch (51 mm) square.
- Diameter at Top: 3 inches (76 mm).
- Diameter at Base: 3-1/2 inches (89 mm).
- Height: 6 inches (152 mm).
- Base Size: 4-3/4 inches (121 mm).
- Color: Safety orange.
- Features:
- Top prevents debris from entering hole.
- Top tab indicates hole center.
- Helical groove inside allows easy removal. Pulling top tab separates form along groove.
- Snap-on flanged base has holes for anchoring to reinforcement or formwork.
- Basis of Design: EZ Sleeve, Model 4012; as manufactured by Auciello Iron Works, Inc.
- Material: 1/16 inch (1.6 mm) thick polyethylene.
- Description: Round form with closed top and snap-on base.
- Maximum Pipe Size: 3-1/2 inch (89 mm) outside diameter or 2-1/2 inch (64 mm) square.
- Diameter at Top: 4 inches (102 mm).
- Diameter at Base: 5 inches (127 mm).
- Height: 12 inches (305 mm).
- Base Size: 7 inches (178 mm).
- Color: Safety orange.
- Features:
- Top prevents debris from entering hole.
- Top tab indicates hole center.
- Helical groove inside allows easy removal. Pulling top tab separates form along groove.
- Snap-on flanged base has holes for anchoring to reinforcement or formwork.
PART III - EXECUTION
3.1 – EXAMINATION
- Do not begin installation until substrates have been properly constructed and prepared.
- If substrate preparation is the responsibility of another installer, notify Architect in writing of unsatisfactory preparation before proceeding.
3.2 – PREPARATION
- Clean surfaces thoroughly prior to installation.
- Prepare surfaces using the methods recommended by the manufacturer for achieving the best result for the substrate under the project conditions.
3.3 – INSTALLATION
- Install in accordance with manufacturer’s instructions, approved submittals, and in proper relationship with adjacent construction.
- Installation Prior to Pouring Concrete: Anchor form with staples, nails, or wire through base flanges or top tab.
- Installation after Concrete Placement: Immediately after placing concrete, press post hole form into concrete.
- Accurately locate post hole forms. Use top tabs to determine spacing and alignment. Ensure forms are vertical and top is flush with concrete surface.
- When concrete has set, grip top tab with pliers and pull form from hole.
- Place posts in holes, brace or wedge to ensure components are vertical and rigid, and fill hole with grout. Maintain bracing until grout sets.
3.4 – FIELD QUALITY CONTROL
- Field Inspection: Coordinate field inspection in accordance with appropriate sections in Division 01.
3.5 – CLEANING AND PROTECTION
- Clean products in accordance with the manufacturer’s recommendations.
- Touch-up, repair or replace damaged products before Substantial Completion.
KEY BENEFITS
- Low Cost: Affordable, high-quality solution to keep your budget intact.
- Lightweight: Easy to carry and maneuver, saving time and effort on site.
- Pull-Out Tab: Quick and hassle-free removal for added convenience.
- Field Measuring Feature: Precise measurements in the field, eliminating the need for additional tools.
- Safety Orange Color: Highly visible for safety and easy identification on any job site.
- Easy to Set: Simple setup that requires minimal effort, reducing labor time.
- Tapered Hole: Designed for a secure, tight fit, improving stability and reliability.
- Multiple Stacking: Stackable design for compact storage and easy transport.

FEATURED PRODUCTS


WHAT IT ELIMINATES

What it Eliminates
- Core Drilling: Say goodbye to costly and time-consuming core drilling.
- Hole Cleaning: No need for messy and labor-intensive hole cleaning.
- Corrosion from Rusting Steel Sleeves: Prevents the risk of corrosion that can weaken materials over time.
- Unsafe Cans & Bottles: A safer, more durable alternative to using makeshift materials.
- Dirt and Water Accumulation: No more worries about dirt and water pooling, keeping your job site clean and dry.
- Use of Pipe Sleeves: No need for cumbersome, rusty pipe sleeves—just an efficient, reliable solution.

Installation Instructions
- Attach EZ Sleeve to concrete formwork at desired locations and pour concrete.
- Press EZ Sleeve into the wet concrete at the desired locations
- After the concrete has set, verify post spacings by measuring centerline distances of EZ Sleeve.
- Pull the tab using pliers just before installing posts. Install the railing or fence post and fill the post hole with grout. Do not pull out the EZ Sleeve or break the seal until installation is ready, as they help verify field measurements and keep out debris and water that could freeze and crack the concrete.